Comfort Food Week: Lamb Cobbler

This is the penultimate Comfort Food Week post. I just couldn’t do a week on comfort food and not include some kind of stew. You may remember I posted my recipe for stew and dumplings back in July, when the weather was still pretty warm, but I just love a good stew, and they are just so easy to put in the oven and forget about.

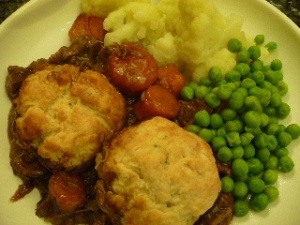
I think my husband would divorce me if I ever dreamed of cooking a stew without any dumplings, and whilst they’re delicious, they’re not the most healthy things ever. So in a search for something a bit less fattening I stumbled across this cobbler recipe on BBC Good Food (I swear I don’t spend ALL my time on that website…). I thought I’d give it a go as the ingredients are so simple, and they’re MUCH less fattening than a regular dumpling. I must admit though, I wasn’t expecting great things. However, I ended up being pleasantly surprised to find that the cobbles were light and fluffy, with a nice crust on top. The yoghurt inside makes them quite dense, but also moist. Admittedly they don’t have that same hint of sweetness that suet dumplings do, as the yoghurt gives them a bit of a tang, but with enough herbs and when eaten with the gravy from the stew you can barely even notice it. So convincing are these cobbles at masquerading as a dumpling that my husband didn’t even notice that they WEREN’T dumplings, which is a great success. I’ve made them several times now and they’ve been great on every occasion.

So far I’ve paired them with this chicken, leek and bacon pie (instead of pastry, obviously) and various stews. My current favourite stew is this lamb one; lamb always feels like such a treat, but this stew makes the most of a often-maligned cheaper cut, the neck, which seems sinewy when you’re cutting it, but by the time it’s been cooking for 3 hours it’s all rendered down and you’re left with lovely silky meat.

The method for making this stew is exactly the same as for the beef stew I posted before, except there are a few differences in ingredients. This is a real winter warmer! I’m hoping I’ll get a chance to make this for a crowd soon; I really want to cook it in a huge casserole dish and cover the entire surface with cobbles (or at least the circumference of the dish). I can’t think of anything more perfect to cook for family and friends in winter; I know I’d want to eat something like this if I’m invited anywhere for dinner!

Lamb Cobbler

Serves 2

For the stew

1 pack lamb neck fillets (probably about 250g) cut into chunks

2 small onions

3 carrots

1 tablespoon thyme leaves or dried thyme

25g butter

25g flour

1 large glass red wine

1 oxo cube

Salt & pepper

For the cobbles

Makes 4 cobbles

75ml natural yoghurt

2 tablespoons olive oil

120g Self raising flour

Salt & Pepper

Pinch of thyme leaves or dried thyme

Method

Preheat the oven to 180C. Melt the butter in a casserole dish and add the chunks of lamb. Cook the lamb until brown, then add the flour and some seasoning and stir together. Add the thyme and the vegetables and cook for a couple of minutes. When the vegetables are turning golden, add the wine and simmer, then crumble an oxo cube into the stew and add 500ml boiling water. Bring to the boil, then put into the oven for 30 minutes.

Once the stew has been in the oven for 30 minutes, take it out and stir. Turn the oven down to 150C and continue to cook for a further 2 1/2 hours. Stir occasionally and top up with a bit more water if necessary.

Meanwhile, make the cobbles. Put the flour, herbs and seasoning into a bowl and make a well in the centre. Add the oil and the yoghurt and mix together with a dinner knife until it comes together as a dough. Use your hands to bring it into a ball, then split it in half and half again, and shape into four flat little patties. Once the stew has 20 minutes left to cook, take it out the oven, remove the lid and place the cobbles on top. Return the dish to the oven and bake for 20 minutes or until the cobbles are fluffy and golden on top. Serve with vegetables of your choice!

Comfort Food Week: Butterbean and Pancetta Soup

You don’t need me to tell you how comforting soup is. It heals you when you’re ill, it warms you, and it generally contains things that are good for you. It is for these reasons that I knew I had to purchase a new blender, after my old one broke a couple of years ago. Two soupless winters were enough for me, so I bit the bullet and bought a new one.

Of course, now I wonder what took me so long, as I settled for this K-Mix blender which makes soup a million times smoother and more velvety than my old one did, and I’m having a great time turning everything and anything into soup. In fact, I’m going a bit soup-crazy at the moment; I’ve started buying reduced veggies from the supermarket so I can turn them into soup (as well as reduced fruit to make smoothies with), which is a really great way to save money! Also it’s going to stop me getting bored of eating the same few soups that I’ve made so far and I’m taking to work every day.

My current favourite soup is this butterbean and pancetta soup. I came across the recipe whilst browsing BBC Good Food, and making soup from beans is not something that I had ever considered before. This is one of those recipes that you think might be really bland and dull because it’s got so few ingredients, and, to be honest, the recipe on its own is a little bland. I added a lot more onion and garlic than the original recipe said, which makes it much more flavoursome and interesting, especially for a garlic freak like me. Another thing about this soup is that I wouldn’t dream of eating it without the pancetta. It’s what makes the soup worth making. Obviously you could use smoked bacon, but it’s the smoky flavour of the pancetta, and its crispness, coupled with the smooth, velvety soup that makes this so good. And considering this soup takes less than half an hour to make from scratch, it’s great for a last-minute lunch or dinner when you’ve got nothing but bacon in the fridge and don’t want carbonara (I seem to find myself in this situation a lot). And one last point: this soup is really really filling. I photographed it here with a slice of bread halved, and I only ate one half with it as it was so filling (I admit though I did eat the other half with butter and jam, oops). If I’d filled these terrines with the soup I’d have had to give up half way through. So be careful when serving!

Butterbean and pancetta soup

Serves 2

1 carton or tin of butterbeans

1 large onion

2 cloves garlic, crushed

A knob of butter

A handful of thyme stalks, stripped of leaves, or 1/2 tablespoon dried thyme

500ml vegetable stock, plus more to thin to preferred consistency

6 rashers of pancetta or smoked bacon

Snipped chives, to serve

Method

Preheat the oven to 200C. Put the butter in a pan and melt on a medium heat. Chop the onions roughly (the best thing about pureeing soup is that nothing needs to be chopped particularly carefully) and soften in the butter for 5 minutes or so. Add the garlic and cook for a further minute.

Drain the butterbeans and add them to the pan with the thyme and stock. Simmer for 10 minutes.

Put the pancetta or bacon on a tray and cook in the oven for 5 minutes or until crisp. Blend the soup until smooth, adding more stock if necessary to thin it down as you like it. Serve with chives snipped over and pieces of pancetta on top. Enjoy!

Comfort Food Week: Chocolate Peanut Butter Brownies

I just couldn’t do a comfort food week without mentioning brownies; they are my favourite sweet treat and over the years have sort of become my trademark cake. I made a brownie tower as my wedding cake, and bake them for most occasions. I find them one of the best things to serve at a barbecue as dessert (apart from Eton Mess, obviously), as they’re one of the few cakes that are dense and squidgy enough to pass as a dessert. They are also amazingly low effort; no icing to fiddle around with, less washing up, easy to double up into larger quantities – they really have their advantages. Their gooey richness makes them so comforting to eat; you can’t help but feel a bit better after eating a good brownie.

So after years of making the same (admittedly, delicious) brownies (my favourites are Nigella’s brownies from How to be a Domestic Goddess), I felt it was time to branch out into something slightly different. As I’ve recently discovered the kilogram jars of Skippy peanut butter at Costco it seemed logical to try and incorporate peanut butter into the brownies. So I found a recipe from BBC Good Food and, once I’d tried it, I wondered what I’d been doing all these years making plain brownies. These are a-m-a-z-i-n-g, not only are they squidgy and sticky and rich, but they have that delicious sweet/salty thing going on which is my favourite flavour combo. Also, as the peanut butter replaces regular butter in the recipe I can only assume that they are healthier and that by making them I have, therefore, done myself and everyone else who eats them, a huge favour.

So without further ado, the recipe:

Chocolate peanut butter brownies

I would say how many this makes but it entirely depends on how big you cut them! It’s about 16 squares.

225g crunchy peanut butter

200g dark chocolate

280g soft light brown sugar

3 medium eggs (I generally use 2 large)

100g self-raising flour

Method

Preheat the oven to 180C and line a square or rectangular baking tin roughly 20cm long with greaseproof paper/parchment. Melt 175g of the peanut butter, 150g of the chocolate and the sugar in a pan and melt gently until the sugar has dissolved and the mixture is liquid.

Take the pan off the heat and beat in the eggs one at a time. Stir in the flour and pour into the tin.

Melt the leftover peanut butter in the microwave or in a pan until it’s runny and drizzle it over the top of the brownie mixture.

Bake for around 35-40 minutes until it’s cracking on top but the middle is still squidgy.

Melt the remaining chocolate and drizzle over the top. Leave everything to cool, cut into squares and enjoy! Once you’ve gone peanut butter you’ll never go back…

Comfort Food Week: Sloppy Joes

The idea for this dinner was borne out of the desire to cook a lasagne, which seems to be the only thing that I feel like I could eat when I have that ‘I don’t know what to have for dinner’ feeling. Unfortunately, though, I don’t think it’s worth making a lasagne unless you do it properly, which takes a long time and isn’t something I want to be doing when I get home from work. It’s definitely one of those things you need to cook up a big batch of on a rainy day and then freeze it for those desperate moments when only lasagne will do (there will be more on this another day). Every time I make any kind of mince-based meal though, I tend to make twice as much and freeze the rest, so I can have another dinner or two without any more effort than taking something out the freezer and reheating it.

This dinner is perfect for those days when you want to just put some stuff in a pan, let it sit there, and then eat it straight away without cooking anything else to go with it. Minimal washing up, minimal effort, total comfort. There is something incredibly comforting about eating a your dinner out of a soft white roll which is full of meat and cheese, whilst sat on the sofa in front of the tv.

I know that Sloppy Joes are generally cooked with some spices and peppers in, but I wanted to use the leftovers for bolognese so I just made the ragu the usual way. If you wanted to make these more authentic, some chilli, cumin, paprika and red peppers would do the trick. Obviously you could easily make these veggie by using Quorn mince and leaving out the bacon.

Sloppy Joes

Serves 2, with half leftover for freezing

500g minced beef/Quorn mince

4 rashers streaky bacon

Olive oil

1 onion

4 cloves garlic

1 carton passata

Glug of red wine

1 tablespoon oregano

Salt & pepper

Cheese and a bread roll, to serve

Method

Heat some olive oil in a pan and fry the bacon. Whilst the bacon is frying, chop the onion finely and add to the bacon once crisp. Cook gently until the onions are soft. Add the garlic, crushed, and the mince and cook until browned.

Once the mince is browned, season and add the oregano, tomatoes and red wine. Simmer for as long as you can, at least half an hour. Serve dolloped into soft bread rolls with a good grating of cheese. Eat with a salad if you feel the need to be healthy, but make sure you have napkins to hand!

Comfort Food Week: Cauliflower Cheese

Despite the fact that, for me at least, all food brings comfort, comfort food is an entirely different way of eating. It often seems that the things that define comfort food are those things that evoke nostalgia, most often from childhood. Personally, the things I find most comforting are the things I’ve been eating for years, that were cooked for me by my Mum and Dad. It may well be that I cook them differently myself now and have adapted the recipes slightly as my tastes have changed, but the relationship I have with the food remains the same.

I think it’s almost implicit in the term ‘comfort food’ that the food isn’t going to be healthy. Think of comfort food and you think of stews with dumplings, steamed puddings, rice pudding, cakes… these things might not be good for your waistline but I definitely think they make you feel that bit better about the long winter ahead. And above all, comfort food needs to be soft, easy to eat, nothing that’s too hard to chew or too crispy; everything should just melt together and be embracing, as opposed to an effort. It’s not just comfort food but comfort eating. And this brings me round to the first recipe of Comfort Food Week: Cauliflower cheese.

One of my absolute favourite things that my Mum would cook for me is cauliflower cheese. Cauliflower is probably my favourite vegetable, and I remember eating it with Sunday roasts from a pretty young age. My Mum taught me how to make cauliflower cheese, and I still use the same recipe now. Every time we go to my parents’ house for a roast dinner, she always cooks a cauliflower cheese for me because she knows I love it so much. Isn’t that the best thing about Mums?

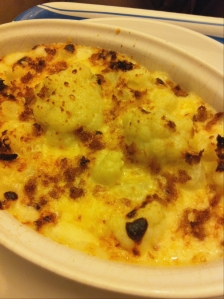
This cauliflower cheese has a little kick to the sauce and, when topped with breadcrumbs and grated cheese, gets a nice crispy top under the grill which is perfect against the tender cauliflower and creamy sauce. Total comfort food. Obviously you could use a mixture of cauliflower and broccoli, or use all broccoli, but I just love the pale serenity of the white cauliflower with the pale yellow sauce. It feels less intrusive than a burst of vibrant green.

Cauliflower cheese

Serves 1

1 small cauliflower

25g butter (a large knob)

25g flour (a few tablespoons)

Pinch cayenne pepper

1/4 teaspoon mustard powder

200/250ml milk

Handful grated cheddar cheese

More cheese and breadcrumbs for the topping

Method

Steam or boil the cauliflower for around 10 minutes until tender. Drain in a colander but don’t shake it or you’ll break the florets up. Just leave them in the colander to dry in their own steam for a minute or two.

Meanwhile, you can make the sauce. Melt the butter in a pan and add the flour, cayenne and mustard. Mix to a paste (this is the roux) and cook for a few minutes. Gradually add the milk and whisk into the roux until you’ve got a thick, silky sauce. You may need more or less milk, it depends how much butter and flour you use, the particular flour you used etc and I never weigh it! Once it’s the right consistency (and I really think it should be quite thick, otherwise you won’t be able to eat it very well!), season with salt and pepper and, with the pan off the heat, whisk in the grated cheese.

Put the cauliflower into a baking dish and pour over the cheese sauce. Top with breadcrumbs and some more grated cheese and place under a hot grill until bubbling, blistered and golden brown. Enjoy with a nice piece of crusty bread!

Comfort Food Week

Starting tomorrow, the next week will be Comfort Food Week on What Charlotte Eats. Now that the nights are drawing in, the leaves are falling from the trees and the temperatures are dropping, all I want to eat are warm, hearty, comforting things. So I have a series of recipes coming up that are the things I turn to on cold days and nights to make the winter seem that bit more bearable. Come back tomorrow for the first installment!

Plum, hazelnut and chocolate cake

I’m really excited about the arrival of autumn, because it’s my favourite time of year and I have a lot to post about! I love everything about this season; root veg, squashes, game, soups and comfort food.

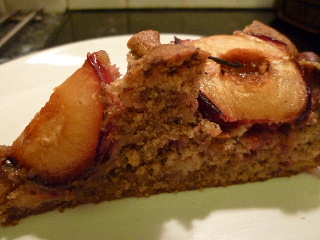
This cake is probably one of the first things I made as autumn arrived; in fact I sort of made it to mark the onset of the season as it felt so autumnal to me. It was really really delicious too! I love cakes with fruit in (as opposed to fruit cake, which is the devil’s work) as they’re always nice and moist. The chocolatey chunks provide a welcome touch of sweetness and richness which works really well with the hazelnuts which are pretty savoury here. The real beauty of this cake is not just that it’s autumnal in its flavour and ingredients, but even the look of the thing is autumnal; the burnished hazelnuts split their skins and go all golden brown, and the redness of the skin on the plums oozes into the golden flesh in the centre and it looks like a real autumnal show in food form. I love it when that happens. In fact, I love it so much I made it into the new blog header picture for autumn!

I got the recipe from BBC Good Food, and it says to use ground hazelnuts in the recipe. Now, I’ve never seen ground hazelnuts in the supermarket, and as I didn’t have any ground almonds in the house either to substitute I ground my own in the food processor. They didn’t grind down as fine as ground almonds, but then the slight grainy texture was quite nice in the finished cake. This is a really great way to use plums, and actually I think it would be great to just make a plain, spiced sponge cake, heavy with cinnamon, and poke some plums into the top before it goes in the oven. I might try this very soon! In the meantime, the recipe for the plum, hazelnut and chocolate cake:

Plum, hazelnut and chocolate cake

175g butter

500g plums

175g light muscovado sugar

175g self-raising flour

175g ground hazelnuts

3 eggs

1 tsp baking powder

50g dark chocolate

2 tbsp hazelnuts

2 tbsp redcurrant, damson or plum jelly

Method

Preheat the oven to 180C and butter and line the base of a 20cm cake tin (I used a loose-bottom one for convenience).

Halve and stone 4 plums and keep by for later, and chop the remaining plums.

If you can’t find ground hazelnuts, grind them in a processor. Then put the sugar, butter, flour, ground hazelnuts, eggs and baking powder into a large bowl and beat with a wooden spoon or electric hand mixer for 1-2 mins, until smooth and light or do what I did and put it all in the processor. Roughly chop the chocolate into fairly small pieces.

Stir in the chopped plums and chocolate, then tip into the prepared cake tin and smooth the top.

Arrange the halved plums over the top of the mixture, pressing them down lightly, then scatter over hazelnuts.

The recipe says to bake for 40-50 mins, but mine took about 10 minutes longer to cook, but I did cook it in a non-fan oven. Once it’s golden and feels firm in the centre, remove it from the oven and cool in the tin for 10 minutes, then take it out and cool on a wire rack. Heat the jelly, then brush over the top of the cake before serving (I left this bit out actually).

This cake is so delicious. Hope you enjoy it!

Homemade toffee popcorn

I know you might think it’s a waste of time to make your own popcorn when you can buy it pretty cheap anyway, but there really is something special about homemade popcorn and it has its merits; you can make as much of it as you like, and it can be made on a whim from items you’ve most likely got in the cupboard anyway (once you’ve bought some popping corn). I think a bag of popping corn is about 50p, so it’s pretty cost efficient and tastes a million times better than the microwave bags of popping corn.

It’s also really really fast to make and really fun. Children and adults alike are always amazed to see corn popping, it’s one of those MIRACLES OF NATURE that never disappoints. The only thing you need to worry about is avoiding getting hot fat spitting in your face, or burning yourself on boiling sugar. Obviously these things are easy to avoid if you’re careful!

I got this recipe from Rachel Allen, and though I haven’t changed the recipe at all, below I give a few tips that they don’t tell you in the recipe.

Homemade Toffee Popcorn

Makes one large bowl

40g popcorn (really you want enough to only just cover the base of the pan you’re using, otherwise it won’t pop properly)

2 tablespoons vegetable or other flavourless oil

40g light brown soft sugar

40g butter

2 tablespoons golden syrup

Method

Heat the oil on a fairly high heat in a large pan with a lid (if you have a pan with a glass lid you can see the magic happening. Very awesome). Once the oil is hot, add the corn and shake gently to spread them along the bottom of the pan. If you have a layer more than one kernel thick they won’t pop properly (you’ll be left with loads of unpopped kernels, worst thing ever) and your pan will be full before they can pop properly. It might not look like much, but once popped it will expand massively!

Once you can hear the corn start to pop, turn the heat down low. You will hear the popping get more furious and constant. If you have a glass lid you’ll be able to see how full the pan is getting. If not then DO NOT open the lid at this stage, because you’ll get covered in spitting, hot fat. Wait until the popping has died down and there are a few seconds between pops, and see how full the pan is. If it’s full but there are more kernels to be popped, empty out the popped corn into a bowl and put the pan back on the heat, leaving the other kernels to pop.

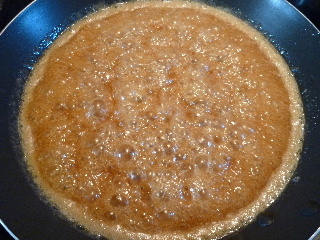
Whilst the corn is popping, put the ingredients for the toffee into a small frying pan on a high heat. The ingredients will melt together and then come to a rolling boil. Boil for a few minutes until the sauce is thick.

Once all your popcorn is ready and in the bowl, pour over the toffee sauce and immediately toss everything together with two spoons or spatulas (DO NOT BE TEMPTED TO USE YOUR HANDS!) Once everything is coated, leave the popcorn to cool for a few minutes. Once it’s cooled it will set into a big lump, so break it up with your hands into individual kernels and enjoy!

Blueberry Hill Cakes

I recently went to a friend’s (amazing) hen party in Brighton and was lucky enough to meet loads of awesome and interesting people. One of those awesome people was Rachel, who told me she’d recently gone self-employed with her friend Ella, running a cake-making business called Blueberry Hill Cakes, catering for parties and weddings.

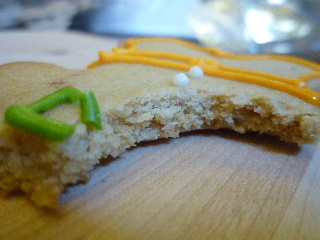
We got chatting about this further, as this is the kind of thing I had at my wedding, and when the topic of my blog came up in conversation she asked if I’d like to review some of their cakes. Of course I jumped at the chance (who am I to turn down cakes?), so in the post arrived a little gingerbread family, in very stylish attire and with some choice eyewear:

Gingerbread people courtesy of Blueberry Hill Cakes

Not only did they look cute but they tasted amazing; I love my gingerbread men a bit chewy and not too biscuity, and these were just that. They were almost cakey and were really fiery with ginger, so delicious! Once I’d taken the photos, I was sat munching on one (the dad), when my husband came home and bit his leg off; fortunately the amputation was not in vain as he enjoyed it so much he proceeded to eat one all to himself. This can only mean that they were very tasty!

Rachel and Ella can cater for any event, whether it’s a party, wedding or any special occasion in London and beyond. I also happen to know that they have a sizeable stock of great prosecco, what more could you want?!

Seeded sausage rolls

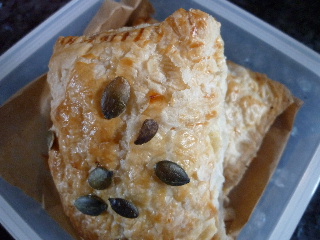
A few weeks ago I took some time off work because my 5 year-old niece came to stay. We knew we were going to take her to Legoland so I said I would cook something with her to take as a picnic. As you’re well aware, my love for sausages knows no bounds, and I know how much children love sausage rolls, so I said we would make those as I also knew it would be something that she could get quite involved with. So, with aprons on, we had a great time mushing up the sausage meat, brushing the egg on to the pastry, and most importantly, testing out the sausage rolls when they were still warm from the oven. They seemed to meet with her approval so they are definitely worthy of an appearance on the blog!

They would be really easy and even quicker to make if you were making them yourself and not with little ones, and they were really really delicious. Best of all, if you can get really good sausage meat then you know exactly what’s going in them, and could add anything you liked into the mixture for different flavours. Oh and no, I don’t make my own puff pastry. Shoot me down if you want, but life’s way too short to be making pastry for a children’s picnic!

Seeded sausage rolls

Makes 8

1 sheet ready-rolled puff pastry

Around 300g sausagemeat

Half a medium onion

1 tablespoon thyme (fresh or dried)

A splash of Worcester sauce

Salt and pepper

Oil for frying

Egg, for brushing

Poppy and pumpkin seeds for sprinkling

Method

Preheat the oven to 180C. Chop the onion very finely and fry in a tablespoon of oil until golden. Leave to cool.

Once the onions are cooled, combine the sausagemeat, thyme, onions, Worcester sauce, salt & pepper. Mix everything together really well (this is where the little ones can get their hands in and get nice and messy!).

Unroll the pastry sheet and cut into 8 evenly-sized squares. I arranged mine in a landscape orientation and made one cut along the length in the middle, and then three cuts downwards.

Arrange a blob of the sausage mixture onto one side of each pastry piece, leaving a bit of room around the edges (don’t leave too much room though, as the meat shrinks up when it’s cooked). Brush the edges of the pastry with water and seal together with the tines of a fork. Brush the top with beaten egg and sprinkle with the seeds.

Bake in the oven for 15-20 minutes until the pastry is puffed up and golden. These taste amazing when still warm for the oven but are perfect for picnics. Enjoy!